
How To Insulate Old Windows Without Buying New: Energy-Saving Window Inserts
 There are a few things that you can count on to keep you cool during the summer (and warm during the winter). Insulation and your HVAC system are two such examples, but energy-efficient window inserts are also important, especially for homes with older, drafty windows. Here’s how.
First, a little background. The exterior shell of your home either lets heat in or keeps heat out. That’s the role insulation plays in the walls, floors and ceilings. But even with optimal levels of insulation in the walls, it won’t be enough to ensure energy savings. That is, if your windows don’t block heat, too.
Drive energy savings in both winter and summer by investing in affordable window inserts. With energy-efficient walls and windows, your air conditioner or furnace will be able to get the job of cooling (heating) your home done, and done well.
Window inserts 101
You don’t need to invest a ton of money in new windows to achieve energy savings and a comfortable home. Window inserts pull their weight, without the significant expense that window replacements require. This is good news for homeowners who don’t want to compromise the aesthetic that unique or older windows bring to their homes. Cost-effective window inserts maintain the look and feel of the home, while driving its energy efficiency.
Instructions for installing energy-efficient inserts
The first step to installing energy-efficient window inserts involves selecting the insert. Choose a manufacturer with a long-standing reputation for delivering a quality product at an affordable cost. Some window insert manufacturers create a product that clips onto the window frame, or employs magnets or clips.
These methods requires extremely precise measurements, and the windows often don’t work in older homes where the window’s wood trim has expanded or shifted. Ideally, you should work with a window insert manufacturer that employs a compression fit. This way, your window insert will have some give and you’ll get the perfect fit.
Step 1: Measure
Once you’ve chosen the product and manufacturer, measure the windows. Take careful measurements, using a measuring tape to outline the length and width of each window. Measure from the inside of the window frame (where the window insert frame will go) on the left side, all the way over to the inside of the window frame on the right side. Do the same from top to bottom. Repeat the process for each window for which you’re ordering inserts, writing down the measurements as you go.
Step 2: Measure again
The old saying with woodworking is “measure twice, cut once”. It’s a good idea to repeat the measurement-taking process at least two to three times to ensure a good fit, because once you order the product, there’s no going back. If you over- or underestimate the calculations, you’ll be stuck with a window insert that doesn’t fit in any of your windows.
Step 3: Place your order
Get in touch with the manufacturer to place your order, and be sure that your measurements are properly conveyed. It’s best to either fax or email your calculations so that the numbers are properly communicated to the customer care representative. Be sure to also label each window, “kitchen,” “hallway,” “living room” and so forth for your own records. When the product is delivered, you’ll be able to match each window insert with the proper window.
Step 4: Install the window inserts
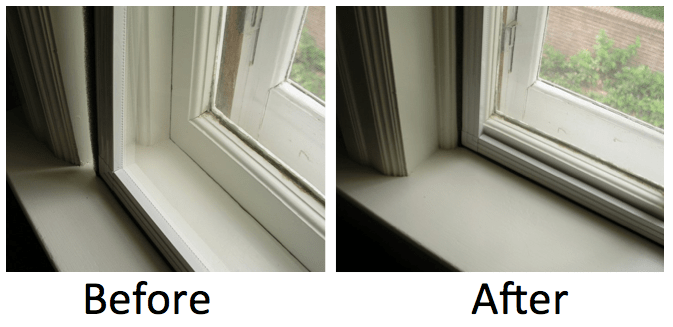
One of the great things about compression-fit window inserts is the ease with which they install. Many window inserts rely on a compression spring around each edge of the window insert. Simply take the first window insert and put it into the proper window, bottom edge first. Then, run your fingers along the sides of the insert, starting at the bottom and working your way up. The insert should “snap” into place. Finish at the top, running your hands over the top edge to ensure the window fits snugly into the frame. Here’s a before and after of what it should look like. The window insert on the left is shown prior to being fitted into its place in the frame.
Step 5: Repeat
Continue installing window inserts for each additional window.
Step 6: Enjoy your new level of comfort and energy savings
Now that your window inserts are installed, sit back, relax and enjoy the new comfort you’ll experience. With an effective heat barrier installed on your windows, your home’s energy efficiency will increase, and you’ll notice dramatic savings on your next utility bill.
Remember, window inserts are just one step in the right direction toward energy savings. Your home works as a system. If your windows are now energy efficient, but you haven’t addressed its insulation, or your HVAC system is really old, you won’t see as dramatic savings on your energy bills, nor for your comfort.
About the Author
Anita Alvarez covers home improvement, energy efficiency and green living as a regular contributor to national publications like Green Living Ideas, Popular Mechanics, Angie’s List, Murphy Oil Soap and USA Insulation. In addition, her experience includes writing freelance business stories for The Content Standard, RichlandSource, and other business publications.
Old drafty window image from Shutterstock. Before and after window insert photos from WindowInserts.com

Get the Green Living Ideas book in softcover or PDF for as low as $2.99!

About the Author
Guest Contributor is many, many people. We publish a number of guest posts from experts in a large variety of fields. This is our contributor account for those special people. :D
Related Posts

How To Be An Environmentally Thoughtful Gamer →

Window tinting for keeping cool and saving energy →

Greening teachers’ and organic farmers’ homes for free: home efficiency for everyone →